Home » Business Services
Category Archives: Business Services
Home Painting – How to Prepare Surfaces and Choose Paint Colors
House Painters Wilmington DE increase the value of your house. Knowing the proper way to prepare surfaces and choosing paints that will suit your environment and lifestyle is important.
Get big samples of any color you like at the store and bring them home to observe in your lighting at different times of day.

Choosing the right paint color is certainly important when it comes to home painting, but so is making sure the surface that’s going to be painted is ready. Whether you’re painting interior walls, furniture or metal surfaces, proper prep is key to getting the job done well and looking great.
If you skip this important step, your new paint job may quickly fade or even flake off. This is because the paint’s bond with the surface will be compromised, leaving you with an unattractive mess that’s not worth the trouble.
The first thing you’ll want to do when preparing for home painting is take care of any cleaning needed for the project. This might be as simple as wiping down the wall or more in-depth, such as sanding the area and then washing it. It’s a good idea to take down any curtains or window treatments that you can to get them out of the way while you’re working on the wall. Similarly, you should remove any smaller items that might get in the way of your work, such as wall hangings or furniture.
Another thing you’ll want to do is protect any nearby surfaces, and this can be done by laying down canvas drop cloths over your floors and covering up any furniture you can’t move. You’ll also want to cover any outlets or light switch covers that you don’t want to be painted. You can usually find covers that go over these outlets and switches at any hardware store, or you might be able to simply unscrew them.
Finally, you’ll want to double-check the paint that you’re planning on using by applying a small amount of it to a wall or piece of furniture in an inconspicuous place. This will help you ensure that the tint of the paint is as you expect it to be, and give you a chance to see how the color looks on the surface that’s going to be painted before you start getting too enthusiastic about breaking out the brushes.
While these are all steps that you can do on your own, for the most professional results, it’s always best to leave this type of work to a reputable home painting company like Our expert crews can handle all of these preparations for you, giving you a fresh and beautiful new look that will last for years to come.
A fresh coat of paint can make a room look updated, refreshed, inspired and on-trend. But choosing the right color can be a challenge. Here are some tips for making the right choice and avoiding the biggest mistakes when selecting home paint colors.
One of the first things you need to do is decide what kind of mood you want for the room. Do you want it to feel bright and exciting, or perhaps calming and peaceful? Once you know this, you can start to pick out the colors.
Start by perusing design/decorating magazines, books or the internet to get ideas for color schemes that you like. Also, take a good look at the fabrics and furniture in your rooms. They may provide a color pattern that you can use as your base for choosing the rest of the colors in your room.
Once you have a few potential paint colors that you think might work, pick up the largest swatches your store has and take them home with you. Tape them on bristol boards and move them around the room to see how they look at different times of day and in different lighting conditions. You may also want to look at them next to your existing fabric (if there is any) and the furniture in the room.
Choose a color that will compliment the fabric and furniture, not compete with it. You can even use a single color in shades and tints (darker and lighter versions) throughout your entire house to create a consistent, restful color palette.
Another thing to consider is what kinds of architectural features you have in your rooms, like crown molding or arched windows. You can highlight these features with contrasting paint or by using paint with a glossier finish. A glossy sheen is more reflective and will make the room seem brighter.
As with any job, the right tools can make all the difference. Without the proper tools, a DIY home painting project can look sloppy and messy. But with the right equipment, you can create a paint job that looks like it was done by professionals — and at a fraction of the cost. Here are some basic tools every DIYer should have on hand for any home painting project:
Rollers are great for covering large surface areas quickly, but if you want to do detail work like around windows or baseboards, brushes will give you more control. Look for high-quality brushes with bristles that don’t easily fall out. They will also be easier to clean than cheap brushes.
A good ladder is a must for getting to the hard-to-reach spots in your house. A telescoping ladder can extend to reach the highest spots, or you can opt for a rolling ladder with adjustable height settings. You may also want a paint pole extender to help you get the top of your walls or ceilings.
It’s important to keep a measuring tape handy so you can accurately estimate how much paint you’ll need. This can save you money by preventing you from buying too much, and it can also help you avoid wasting time and effort as you apply your first coats.
If you’re using a sprayer to paint your walls or ceiling, it’s important to keep in mind that sprayed paint can drift, so you’ll need to move or cover items nearby. Airless sprayers are the best option for larger projects, but you can also find low-pressure options that provide excellent control for small jobs.
A heat gun is a useful tool for stripping old paint or removing wallpaper, and it can also be used to soften caulk or putty, thaw pipes and bend plastic. This is a must-have tool for anyone who is undertaking an extensive home painting project.
A paint multi-tool has all the tools you need to scrape, clean a roller, and open a can of paint. It can be made from plastic, metal or another material and comes in a variety of different sizes and features. Some even include a handle that hammers the lid of the can closed, which can be helpful for avoiding broken nails.
Home painting is one of the most basic and effective ways to make a big impact on the appearance and value of your home without the expense of major renovations. Whether you want to create a bright, welcoming entryway or a fresh new look for your bedroom, there’s nothing quite like a fresh coat of paint to brighten up any room. But home painting is not a simple task, and it can be challenging for novices to get the results they’re looking for.
First, it’s important to choose the right subject. You’ll need to select a subject that inspires you, challenge you, and is suitable for your skills and equipment. It should also provide a variety of compositional opportunities and color schemes, and it should be an easy fit for your space (considering both size and lighting).
You’ll also need to choose the type of paint you want to use. There are a few basic options available: oils, acrylics, and watercolors. Oils are the most traditional and expensive, but they offer the best long-term durability. Acrylics are the most popular for beginner painters as they’re easy to use and dry quickly. Watercolors are more difficult to work with, but they can produce beautiful, delicate results.
It’s also important to prepare your workspace before you start painting. You’ll need to cover floors, move furniture away from walls, and take other steps to protect surfaces and hardware from spills and splatters. Don’t skip this step – it will save you time and frustration later on.
When you’re ready to begin, it’s a good idea to start with a small sample and test the color on your wall or a piece of white poster board. This will help you gauge how the paint will look under different lighting conditions and to see if it has the color you’re after.
Another perk of the painting business is that startup costs are lower than for other types of businesses. You don’t need to stock up on power tools or other expensive equipment, and you can recoup your initial expenses by taking on more jobs.
Hardwood Floor Refinishing
Hardwood Floor Refinishing NJ is an inexpensive way to change the look of your home. This process is not a DIY project and requires professional training and equipment.
Keeping up with regular maintenance will help reduce the amount of wear and tear on your hardwood floors. However, refinishing is necessary for those with heavier use or indoor pets.
When refinishing hardwood floors, the wood type used plays a big role in choosing the finish. For instance, pine floors are softer than oak and other hardwoods but can withstand wear and tear. If these floors need a new look, refinishing them with a darker stain could be an option.
There are also a variety of finishes available for hardwood floors, with surface and penetrating options. Surface finishes stay on the top of the wood and establish a protective shell, with examples including polyurethane and acid-cured (Swedish finish). Penetrating oils are similar but soak into the wood’s pores to create a long-lasting integral defense. Examples of these include linseed, tung, Danish oil finishes, and hard wax oils.
A professional refinishing company will know what products are best for each floor. They’ll be able to advise you on the advantages and disadvantages of each option.
Before work starts, it’s important that all furniture is moved and that the area around the floor is covered with plastic sheets or masking tapes to keep out dust and debris. Depending on how much work needs to be done, the space may be completely off-limits to anyone not working in the room.
Refinishing can be done on solid or engineered hardwood, but only if the floors have been refinished. This means that the planks were sanded and stained at the factory. This cuts down on the amount of sanding and staining needed at the home and can reduce the number of times the flooring needs refinished. Solid hardwood can be refinished up to four times, but engineered hardwood can only be refinished two or three times before the layer is too thin and the plywood or synthetic core is exposed.
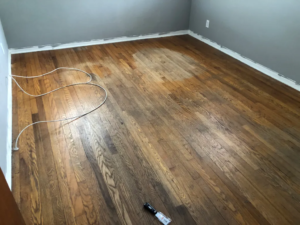
Before you sand your floor and begin the process of refinishing, it is very important to clean the surface thoroughly. This step will remove dust, dirt, and debris that may be trapped in the existing finish. This is especially important if you have children and pets in your home, as these contaminants can be very hard to remove once they are dried into the finish. Typically, this will require vacuuming the entire room multiple times and using a broom or mop to remove any remaining debris.
Once the floors are clean, you can determine if a complete refinish is needed or if a screen and recoat will be sufficient to fix your wood flooring. A recoat involves lightly roughing up the existing finish layer with either a soft sanding or screening and then applying a new coat of protection. This will take care of minor scratches and dents on the hardwood floor’s surface layer and is significantly less expensive than refinishing.
While the homeowner can do refinishing, it is recommended that you contact a professional to ensure your floors look their best. Professional refinishers have unique containment systems, allowing them to sand your floors without bringing dust into the rest of the home. This will save you a lot of time, money, and headaches.
Once the refinishing is complete, let your floors dry completely before allowing traffic. Be sure to allow plenty of time for this, as the floors can become very slippery when wet. You can choose your final stain color when the floors are completely dry. Selecting a low stain in VOC (Volatile Organic Compounds) would be best.
Hardwood floor refinishing involves using a large drum sander to remove the topmost layer of protective finish from your floors. This will reveal the natural wood beneath and remove major scratches, gouges, discolorations, and other imperfections. Once the sanding is done, the stain is applied (if desired), and a new coat of finish is applied. The process can take a few days and requires special equipment.
Before beginning the sanding process, protecting your walls and furniture from dust is important. Use plastic sheeting secured with painter’s tape to cover doorways and vent ducts, and be sure to remove base shoe molding along the wall-floor joint before starting sanding. This will allow the edge sander to reach closer to the walls without damaging them. You should also remove rugs and carefully cover any furniture in the room.
Start with a 40-grit belt on your sander and work up to a 60 or 100-grit to eliminate the old finish and any major surface scratches. It cannot be easy to see where you have sanded, so it is helpful to mark with pencil lines on the floor or wall where you’ve started and finished sanding. It is also a good idea to use landmarks, like light switches and electrical outlets, to help you keep track of where you are in the room.
Once the sanding is done, cleaning the floor thoroughly with a commercial degreaser or hot water and bleach solution is important. This will prepare the surface for staining and improve your new finish. Depending on the type of finish you are applying, it may require several coats to achieve the desired appearance. Allow the floor to dry completely between each coat of finish.
Wood flooring can be stained in various colors to complement a room’s decor. This also hides small scratches and dents that cannot be fixed with sanding alone. Major gouges and dents are best addressed by consulting with your BCC, who will assess the damage and determine the most effective plan for moving forward.
First, the hardwood must be sanded to remove old finish and bare boards. This can be done with a large drum sander. Wear the proper safety equipment and have plenty of space to work. The area must be well-ventilated, as staining and sanding produce strong fumes.
After sanding, a water-based sealer should be applied to the floor to prevent it from drying out too quickly. This protects the wood from moisture and helps the new stain adhere to the surface.
Then, a water-based stain is applied with an applicator pad attached to a pole. Start in a corner away from the door and work outwards to avoid lap marks. Apply several coats as the manufacturer recommends, letting each one dry fully between applications.
Finally, a polyurethane topcoat is applied with a brush. A minimum of three coats are recommended, as this will help create a beautiful sheen on the hardwood and provide a protective barrier against future wear and tear.
Refinishing your hardwood floors can be an easy and rewarding project. However, it is not a job you should try alone. It requires a lot of time, patience, and the right equipment. If you are not prepared to take on this task, hiring a professional is a good idea.
Refinishing is the way to go if your hardwood floors have major gouges or scratches. While it will take time and expense, a new coat of finish will fix these problems and protect your flooring from further damage.
Refinishing begins by using a floor buffer/sander to remove the existing finish from your floors. After sanding, the wood is stained and coated with a new protective finish. A full refinish typically takes a day, depending on the product type and drying time. Following the manufacturers’ instructions carefully and sweeping and vacuuming between each sanding is important.
Once the sanding is done, you can apply a coat of stain, which helps to bring out the natural beauty of your hardwood floors. It would be best to use a water-based stain, as it has a lower odor and dries faster than an oil-based one.
Staining should be done in a well-ventilated room, as it will get messy and require patience. It is also helpful to work in small sections at a time and follow the wood grain’s direction. Once the stain is applied, it must dry completely before adding additional finish coats.
If you’d like to add a little extra flair to your hardwood floors, apply shoe base molding or quarter-round trim along the bottom edge of your floor. This will help to hide any dust or sanding residue that may fall against your baseboards. Before installing these trim pieces, it is a good idea to protect them from the sanding machine by placing a piece of scrap wood over them.